
Last month at WWDC 2019, Apple released a heap of information to continue building on their software platforms. This year’s event was jam packed with new features such as user profiles on tvOS, standalone AppStore on watchOS and dark mode on iOS. Also announced was the stunning Mac Pro and Pro Display which is a powerhouse of a machine that can tackle extreme processing tasks.
Apple has a recurring theme of releasing mind-blowing features, but nothing was more exciting than the announcement of SwiftUI. As Apple’s VP of Software Engineering, Craig Federighi, announced the new UI toolkit, it felt like a metaphorical bomb dropping in the middle of the room!
Shortly after a quick SwiftUI overview, the keynote was over. Developers were left excited, stunned and filled with hundreds of questions about the new UI framework. It felt like the only thing missing from the SwiftUI announcement was the iconic “One More Thing” introduction slide Steve Jobs was known for using.
The blog explains what SwiftUI is, the benefits of using SwiftUI compared to the current UI programming method and how SwiftUI handles data management.
SwiftUI and Declarative Programming
Let’s take a step back and look at what makes this UI toolkit exciting. SwiftUI let developers build the designs for their apps in a new declarative way. Native iOS developers have only known how to build and maintain their UI through imperative programming. Imperative programming requires the user to maintain every UI state themselves and update each item to keep it in sync with their data models. As your UI elements increase, so does the complexity of your logic management, leading to state problems.
With declarative programming, the developer sets the rules that each view should follow and the framework makes sure those guidelines are enforced. As the user interacts with your UI and your data model changes, the view will rebuild itself to reflect those changes automatically. This vastly reduces code complexity and allows developers to create robust user interfaces with fewer lines of code. Other development frameworks, such as ReactNative and Flutter have already been using this declarative UI paradigm, and developers love how quickly they can put together the UI and how this produces easy to read code.
But the declarative framework is only part of the story. SwiftUI brings even more enhancements to iOS programming, such as live previews in Xcode, drag and drop programming and cross-platform development.
Overview of SwiftUI
In order to display the simplicity and beauty of SwiftUI, I think it’s worth seeing a small sample of code. Let’s think about a single view app that contains a table view. This is a view that iOS developers have programmed countless times. You immediately think of adding a UITableView through Interface Builder or programmatically, then assign its datasource and delegate to your ViewController. You then need to add the required datasource and delegate functions to fill the content of the table view. Before you know it, this simple table view is up to 30 lines of code.
Here’s the Swift code for a basic table view that displays a list of country names:
class MasterViewController: UITableViewController {
    var countries: [Country] = fullCountryList

    override func viewDidLoad() {
        super.viewDidLoad()
    }

    // MARK: - Table View
    override func numberOfSections(in tableView: UITableView) -> Int {
        return 1
    }

    override func tableView(_ tableView: UITableView, numberOfRowsInSection section: Int) -> Int {
        return countries.count
    }

    override func tableView(_ tableView: UITableView, cellForRowAt indexPath: IndexPath) -> UITableViewCell {
        let cell = tableView.dequeueReusableCell(withIdentifier: "Cell", for: indexPath)

        let country = countries[indexPath.row]
        cell.textLabel?.text = country.name
        return cell
    }
}
Now we can take a look at the code needed to create that same table in SwiftUI:
struct MyTableView : View {
    @State var countries: [Country] = fullCountryList

    var body: some View {
        List(countries) { country in
            Text(country.name)
        }
    }
}
Believe it or not, the part of that code that actually displays the table view is the 3 lines of code inside the body computed variable, and that includes the closing bracket. The List struct knows to infer the count and can adjust its cell to display the text.
You’ll notice that MyTableView is of type View. In SwiftUI, a View is a struct that conforms to the View protocol, rather than a class that inherits from a base class like UIView. This protocol requires you to implement the body computed variable, which simply expects a View to be returned. Views are lightweight values that describe how you want your UI to look and SwiftUI handles actually displaying UI on the screen.
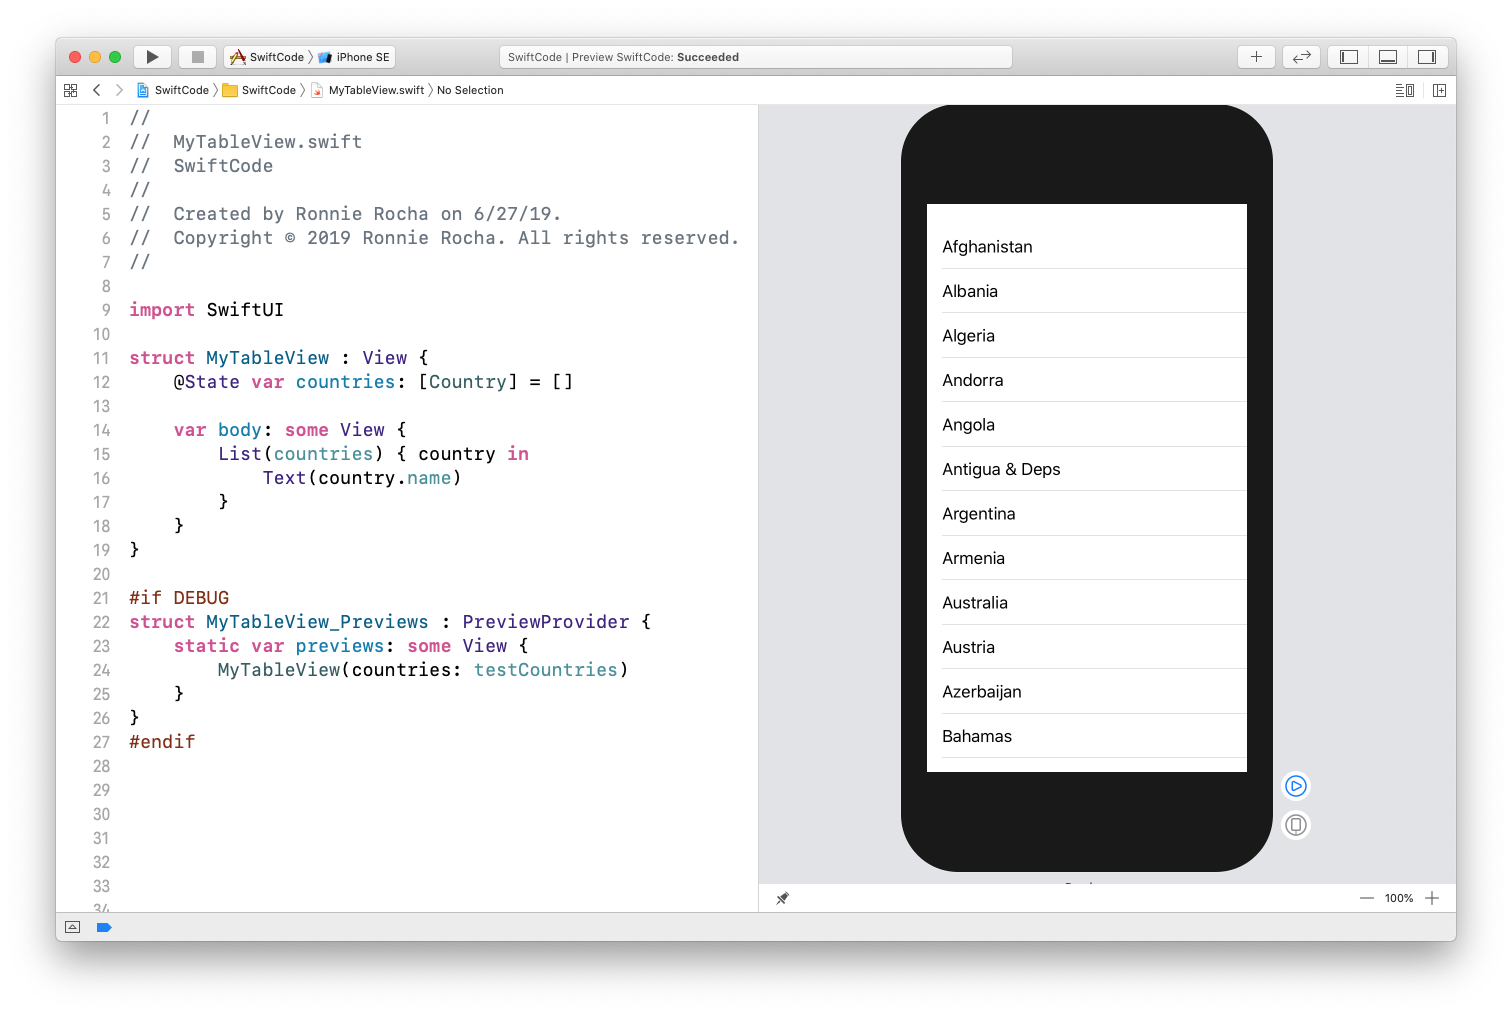
Using Xcode 11 and SwiftUI, you now have the canvas on the right panel which shows you a live preview of your code. This preview is created by the PreviewProvider block of code that is automatically added with each new View you create. The beauty of this preview is that it refreshes itself as you make changes to your code without having to build and run with each change.
This will surely decrease development time as you no longer have to compile your entire project to check your minor UI adjustments while working to make your app design pixel perfect to the design specs.
Data Management with SwiftUI
This only scratches the surface of what SwiftUI brings to iOS development. SwiftUI is easy to use but there are advanced features that allow you to take your app to the next level. Developers will want to dive deeper into how data is managed within SwiftUI. To keep your data and UI in sync, you will need to decide which views will maintain the “source of truth” for your app and which views will simply be passed as reference data.
Let’s imagine we’re developing a media player and working on the Player screen. This will have many UI elements, but we’ll simplify it to the play/pause button and a progress view.
Here’s a rough model:
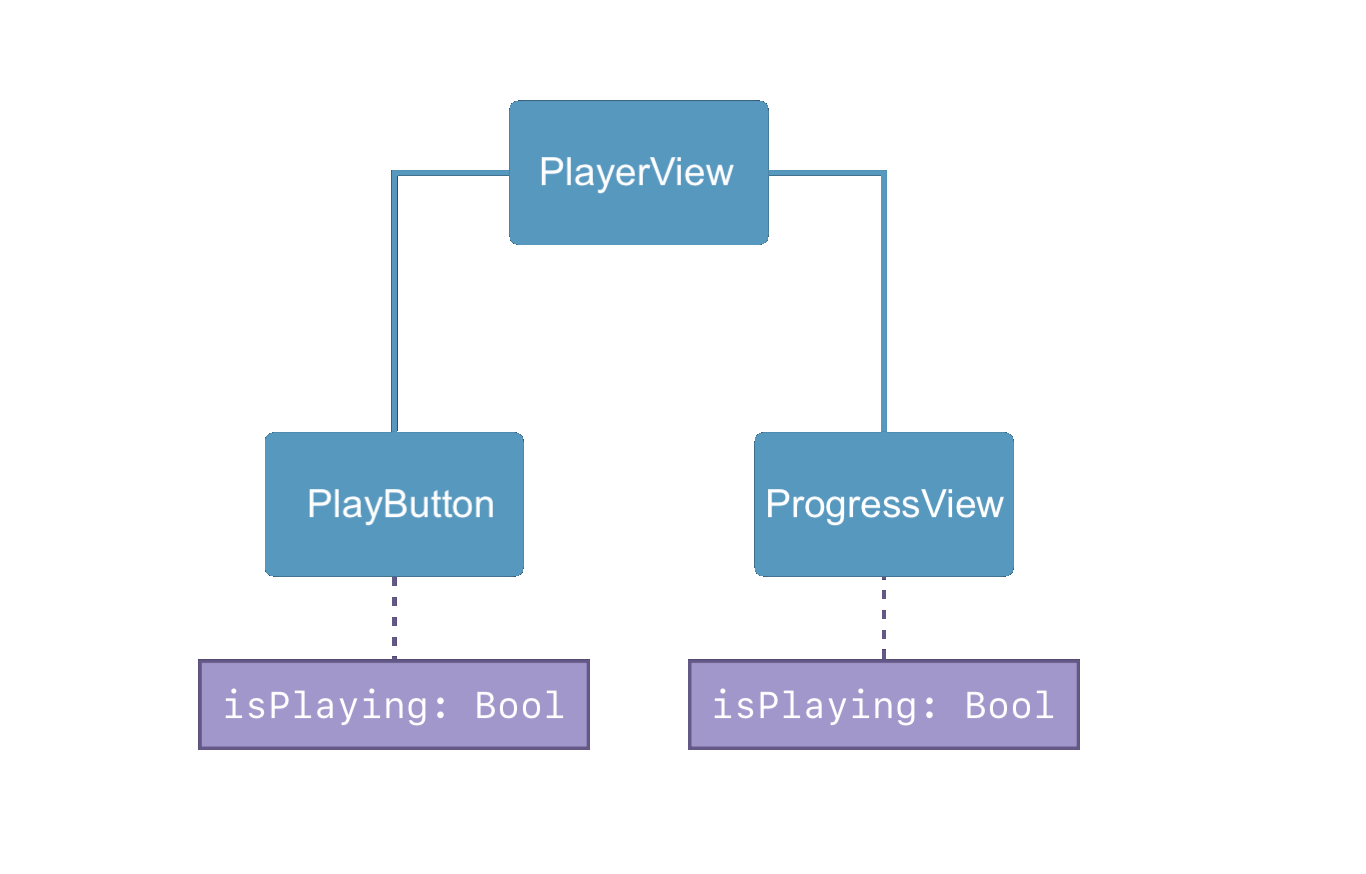
Here you have the PlayerView with smaller SwiftUI views to maintain the PlayButton and ProgressView. Each SwiftUI view will need the isPlaying attribute to know how to update its own UI state, but if each view is maintaining its own value, this could cause state problems.
Instead, we want there to be a “master” isPlaying attribute that all the SwiftUI views can read and react to. Here’s a better model:
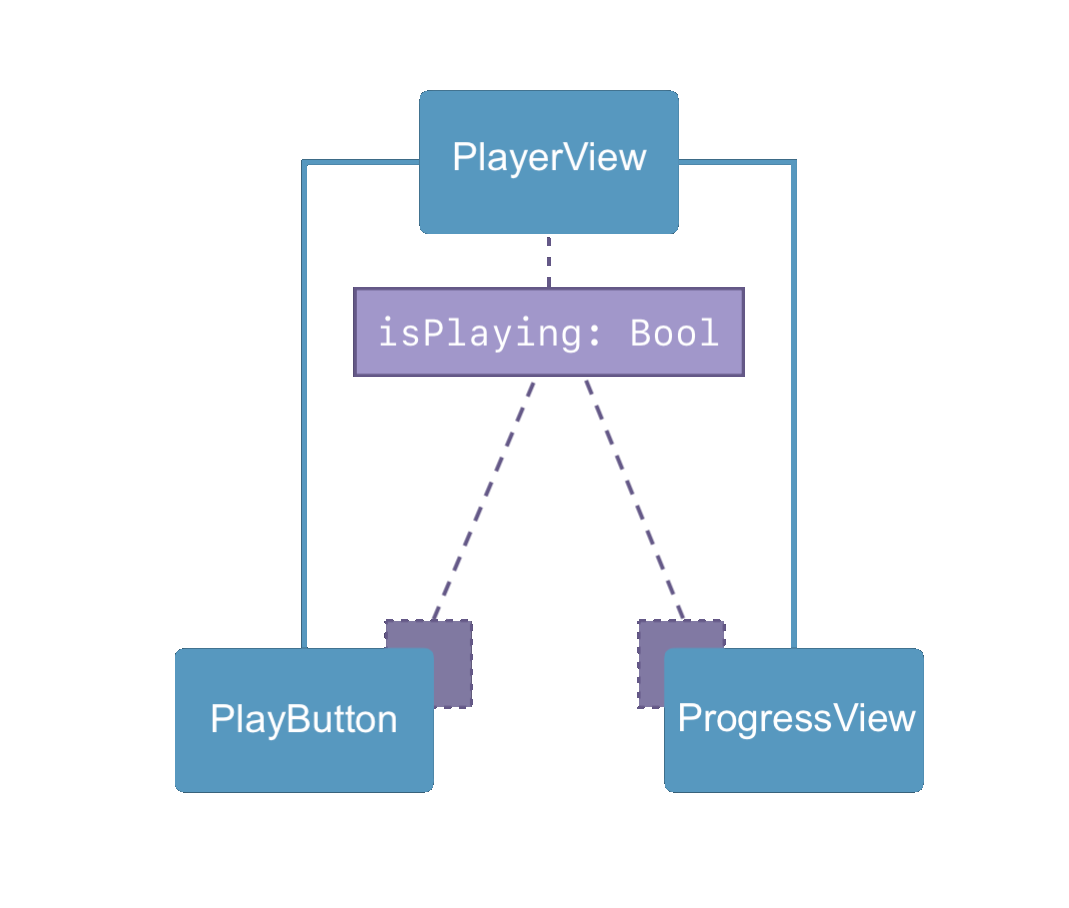
The parent PlayerView will hold the master isPlaying attribute and the child views will only reference this variable. When the user interacts with the child UI elements to manipulate the isPlaying boolean, those changes will make their way through the views that are associated with the variable.
Let’s take a look at what this looks like in our code:
struct PlayerView : View {
    let episode: Episode
    @State private var isPlaying: Bool = false

    var body: some View {
        VStack {
            Text(episode.title).foregroundColor(isPlaying ? .white : .gray)

            PlayButton()
        }
    }
}
This SwiftUI PlayerView is a vertical StackView that has a Text label with the show title and a PlayButton View.
Swift 5.1 will introduce Property Wrappers, which allow SwiftUI to use the keyword @State and @Binding to add additional logic to your view’s variables. In the code above, the PlayerView is the owner of the isPlaying attribute so we indicate this with the @State keyword.
struct PlayButton : View {
    @Binding var isPlaying: Bool

    var body: some View {
        Button(action: {
            self.isPlaying.toggle()
        }) {
            Image(systemName: isPlaying ? "pause.circle" : "play.circle")
        }
    }
}
Now looking at the PlayButton code, we have the isPlaying boolean here as well, but we added the @Binding keyword to tell this View that this variable is bound to a @State attribute from a parent view.
When a parent view calls a child view, they can pass the State variable to the Binding variable as a parameter into the View and use the “$” prefix:
struct PlayerView : View {
    let episode: Episode
    @State private var isPlaying: Bool = false

    var body: some View {
        VStack {
            Text(episode.title).foregroundColor(isPlaying ? .white : .gray)

            PlayButton(isPlaying: $isPlaying)
        }
    }
}
By doing this, when a binding variable is changed by some user interaction, the child view sends that change through the entire view hierarchy up to the state variable so that each view rebuilds itself to reflect this data change. This ensures that all your views maintain the same source of truth with your data models without you having to manage each view manually.
This is a high level introduction to data management with SwiftUI. I encourage you to dig further into this topic by watching the WWDC tech talk, Data Flow Through SwiftUI.
Start Working with SwiftUI
The best way to grow your knowledge of SwiftUI and learn its more advanced functions is to start using it to build an app. The great news is that you don’t have to build an entire app from scratch in order to use SwiftUI. Apple provided classes and protocols that allow you to integrate newly designed SwiftUI views into your existing projects.
So the next feature you work on for your iOS, watchOS or tvOS project, consider developing one of the views in SwiftUI and integrate it into your project.
If you want to keep digging into SwiftUI, check out these WWDC Tech Talks and Tutorials:
- Tech Talk: SwiftUI Essentials
- Tech Talk: Data Flow Through SwiftUI
- Tech Talk: Integrating SwiftUI
- Tutorial: Learn to Make Apps with SwiftUI
Here at Phunware, our architects and developers stay up-to-date with the latest changes from Apple WWDC and Google IO. If you’re interested in joining the Phamily, check out our latest job openings. We’re currently looking for Android and iOS software engineers!


Very nice! I’m excited about the time saving in development.